This post may contain affiliate links, my full disclosure can be read here. As an Amazon Associate I earn from qualifying purchases.
Looking for a super cute DIY planter box idea? This birdhouse planter is so easy to make and perfect for your flowers and herbs!


This cute birdhouse planter box has become one of my favourite garden planters. It all started a few years ago when my daughter and hubby secretly made me one for Christmas.
We’ve loved them so much that he’s been making them ever since!
If you would love an easy DIY project that adds some country cuteness to your deck, fence, or backyard you just have to try making a few of these birdhouse planter boxes.
Don’t miss the printable version at the end of the tutorial.
Material List
- 2 – 1×6 @ 8 feet
- 1 1/2” wood screws
- 1 1/4” spiral finishing nails
- 3/4” finishing nails
Materials For Trim (optional)
- 1 – 2×4 @ 2 feet to make the shingles and trim listed below
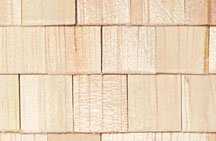
- 48–55 wooden shingles (make your own or you can buy ready made shingles for dollhouses)
- 4–6’ of trim
- Wood glue (outdoor hot glue for wood works best!)
Cut List
- Cut 2 pieces 21” long for the sides
- Cut 1 piece 27 long for the base
- Cut 4 pieces 8 1/4” long for the front and backs of the birdhouse
- Cut 2 pieces 5” long for the roof
- Cut 2 pieces 5 1/2” long for the other roof side


How To Make A Birdhouse Planter Box
Step 1


Take the birdhouse front and back pieces and cut two 45 degree angles on one end to form a peak with your chop saw.
Step 2


The next step is to make the holes for the birdhouses.
Take 1 of the front pieces and measure down 3 3/4” from the center of the roof point, this will be the center of the hole. Using a 1 1/4” saw drill bit make the hole.
Then repeat for the 2nd front piece.
Step 3
Sand all the pieces and the inside of the birdhouse hole.
Step 4


The next step to assembling the birdhouse planter box is to attach the roof pieces together.
Take one of the 5” roof pieces and one of the 5 1/2” roof pieces and place the edges together as shown in the photo. Nail them together on each corner.
Step 5


Now you need to attach the outer edges of the face of the birdhouse piece to the base.
Measure back 3 inches from the edge of the base and mark it with a line.


Start 2 screws along the marked line, then while holding the birdhouse front to the base finish screwing them together.
Repeat on the other end.
Step 6


Now it’s time to add the back piece of the birdhouse. Measure back 3 1/2 inches from the front piece and mark and attach the base using the same method you used to attach the front piece.
Repeat on the other end.
Step 7


With the planter laying on its side, lay the side boards over the top as shown.


Nail the side board to the birdhouse front pieces with 3 nails.
It’s not necessary to nail into the back piece of the birdhouse as it is held together by the roof and floor base when fully assembled. That way the nails won’t be visible on the sides.
Repeat the steps to add the second side board.
Step 8


Turn the birdhouse planter right side up. Then place the roof onto of the birdhouse.
Line it up so that the roof overlaps the back wall by about a 1/4 inch.
Nail the roof down into the birdhouse with 2 nails on each side.


Now the basic birdhouse planter box is finished! You can use it as is or add some trim and decorations to make it look really cute.
How To Trim Your Birdhouse Planter Box
We make our own mini wooden shingles for our birdhouses and other projects. They are really easy to make! I’ll have a full tutorial online soon but it’s also included in the printable version of the birdhouse planter.
If you would rather buy ready made shingles the ones made for dollhouses will work well! They come in a variety of shapes and styles.
Dollhouse Miniature Unfinished Pine Square Butt Shingles Leafware Dollhouse Shingles 1.5x.75 400/Pkg-RectangularDollhouse Miniature Unfinished Pine Octagon-Butt Shingles


Adding Wood Shingles


Start by taking your wood shingles and lining up the first one so it slightly overlaps the front edge by a 1/4 inch.
Attach all the shingles on the outer edge with 2 finishing nails for extra strength. The shingles on the inside only need 1 nail.


Add 3 more shingles access the bottom layer as shown.


To start the 2nd row of shingles you will need a half piece.
Find a shingle that has a straight grain and break or cut it down the centre.
Attach it along the outside edge overlapping the first row. So it covers the nail holes.


Finish the 2nd row by adding 2 more full-size shingles and end it with 1 more half piece.


The 3rd row of shingles is 4 full-size pieces the same as the 1st row was done.
When you have finished the first side of the birdhouse roof, repeat the same pattern on the 3 remaining roof sides.
Adding Trim


Taking the thin trim strips place it up to the back edge of the birdhouse cut it to fit as shown with a 45-degree angle on each end.


Nail it into the back of the birdhouse.
Repeat on the remaining front and back sides of the birdhouses.


Now it’s time to add the trim to the roof. Measure and cut the trim so it covers the top layer of shingles and nail it to the roof. Repeat 4 times to form the roof peak on both birdhouses.

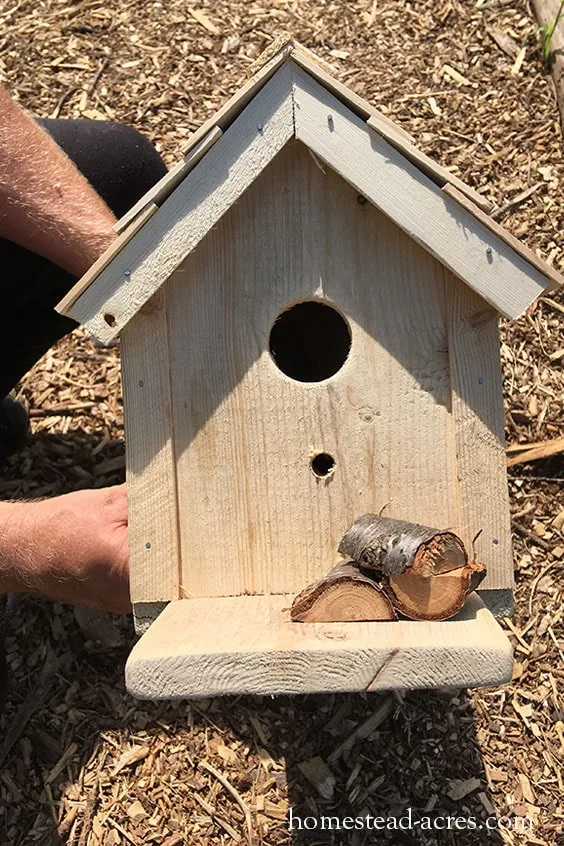
To add some extra cuteness take some thicker branches and cut them into rounds 2 inches long. Then split the rounds into 4 long pieces so they look like tiny firewood logs.
Nail them down into the base in front of the birdhouse.
Add A Perch
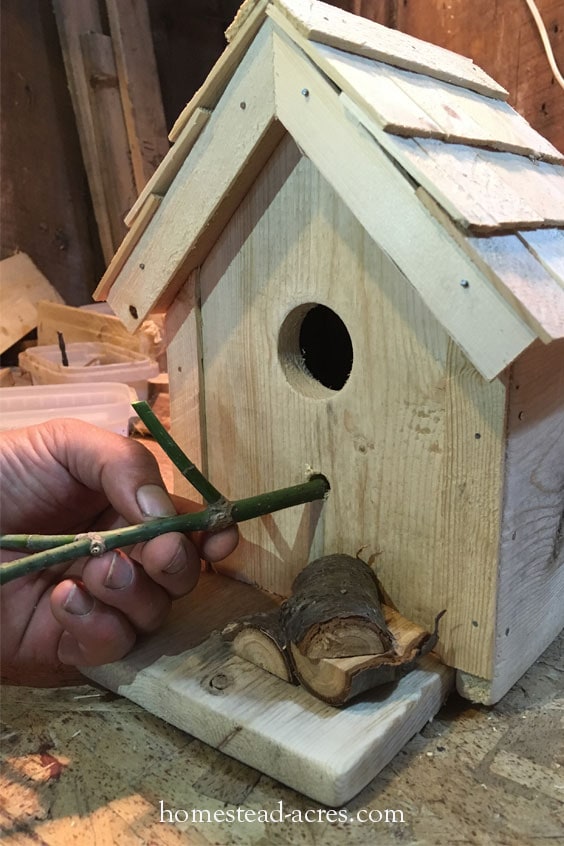

If you would like to add a perch to the birdhouse. Cut a nice sized branch ( you can also use a wooden dowel ) and drill a hole close to the diameter of the stick.
Fill the hole with a good quality hot glue for wood and place the sick inside. Repeat for the other birdhouse.


Making your own wooden planter box is easy to do and these just look so cute on your deck or fence.
When you make one I’d love to see it! Be sure to tag me on Instagram @homesteadacres
Want an easy to print version? I share printables as a bonus to my subscribers. Sign up below to get your copy.
Connect With Homestead Acres!
Be sure to follow me on social media, so you never miss a post!
Facebook | Twitter | Pinterest | Twitter
Visit my Amazon store to find all my favorite gardening, homesteading tools, and gadgets plus all of my printed garden books and journals!


Kim Mills is a homeschooling mom of 6 and lives on an urban homestead in Ontario, Canada. Blogging at Homestead Acres she enjoys sharing tips to help you save money, grow and preserve your own food.
Dianna Plemons
Tuesday 27th of July 2021
Hiya Kim, you have the best ideas and I love your website. Your so informative and I appreciate how much I learn from ready your stories. I just wanted to say thank you 😊 a God bless you and keep the good work up! Dianna Plemons Henrietta, TX