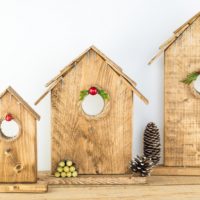
Easy DIY Christmas Birdhouse Ornament
You’ll love these cute Christmas birdhouse ornaments! This simple rustic birdhouse craft are perfect for decorating your mantle or adding some country-style warmth to your side table display. They also make the perfect gift idea for anyone on your list who loves birds. A great way to use up pallets or scrap wood for Christmas craft projects.
Yield: 3
Equipment
- Foam paintbrushes
- 1 1/4” finishing nails
- Hot glue gun
- Drill
- Drill hole saws
- Chop saw or hand saw
- Hammer
Materials
- 1 x 4 cut to 5 3/4” - for the small birdhouse face
- 1 x 6 cut to 8” - for the medium birdhouse face
- 1 x 6 cut to 10 1/2” - for the large birdhouse face
- 1 x 2 cut to 5” - for the small birdhouse base
- 1 x 2 cut to 7” - for the medium birdhouse base
- 1 x 2 cut to 9” - for the large birdhouse base
- Mini wooden shingles
- Walnut stain
- Nautical rope
- Greenery
- Plastic red berries
- Silver glitter glue
- Hot glue
- Pinecones painted or natural
- Small sticks
Instructions
- Cut each board to the length needed for the birdhouse face height. Then cut a 45-degree angle on each side of the top to form the roof peak.
- Next, you need to make the holes for each birdhouse. For the small 5.75” birdhouse measure down 1.75” from the peak and drill a 1-inch hole. The measurement is to the top edge of the hole. For the 8” birdhouse measure down 2.5” and drill a 1.25” hole. Use the same sized hole for the 10.5” birdhouse but with a 4.25” distance from the roof peak to the top of the hole.
- Finally, sand all the edges smooth and wipe off any dust before going further.
- Center the birdhouse face along the back edge of the base and nail them together.
- Glue or nail the wooden shingles along each side of the roof evenly spacing them so that they are even at the top.
- Using a paintbrush apply the walnut stain to the entire birdhouse, then wipe off excess stain with a rag.
Once the birdhouse has fully dried you can start to decorate it. - Cut a length of nautical rope so that it fits around the outside of the birdhouse hole. Hot glue it down starting at the top edge and working slowly around the circle. Then glue 2 small pieces of greenery over top of the rope seam and then finally hot glue a red berry on top.
- Cut some short branches and hot glued one of them to look like a peg on the front. Then glued down more branches along the front to look like a mini stack of firewood.
- On the other side of the birdhouse glued down a small pinecone that had been painted with chalk paint to look like it had been dusted with snow.
- Finally, use some silver glitter glue to draw little icicles along the top edge of the birdhouse.