Easy DIY Christmas Birdhouse Ornaments
This post may contain affiliate links, my full disclosure can be read here. As an Amazon Associate I earn from qualifying purchases.


I love these cute Christmas birdhouse ornaments! These simple rustic birdhouse crafts are perfect for decorating your mantle or adding some country-style warmth to your side table display. They also make the perfect gift idea for anyone on your list who loves birds.
I love decorating our home with cute birdhouses and our yard as well of course.
It’s starting to look more and more like a bird sanctuary outside with all the fun birdhouses my husband enjoys making.
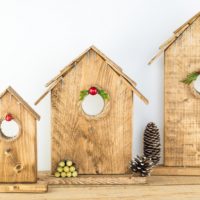
But we came up with these cute Christmas themed birdhouse ornaments and I just love how cute they look sitting on our mantle!

If you love rustic ornaments then you will love these birdhouse faces and they are so easy to make too. You can easily make these out of pallets or use inexpensive wood. If you do wood crafts you may even have enough scrap pieces that you can use as well.
You can leave the wood natural and they are cute but we decided to stain them a warm walnut color that fits in with any Christmas color schema.
While the little pop of color from the wreath around the birdhouse hole makes it stand out perfectly.
Keep reading for the step by step on how to make your own birdhouse ornaments and don’t miss the video too!
Easy DIY Christmas Birdhouse Faces

Supplies
- 1 x 4 cut to 5 3/4” – for the small birdhouse face
- 1 x 6 cut to 8” – for the medium birdhouse face
- 1 x 6 cut to 10 1/2” – for the large birdhouse face
- 1 x 2 cut to 5” – for the small birdhouse base
- 1 x 2 cut to 7” – for the medium birdhouse base
- 1 x 2 cut to 9” – for the large birdhouse base
- Mini wooden shingles
- Walnut stain
- Nautical rope
- Greenery
- Plastic red berries
- Silver glitter glue
- Pinecones, painted or natural
- Small sticks
- Foam paintbrushes
- 1 1/4” finishing nails
- Hot glue
- Hot glue gun
- Drill hole saws – These make putting in the birdhouse holes so much easier!
- Drill
- Chop saw or hand saw
- Hammer
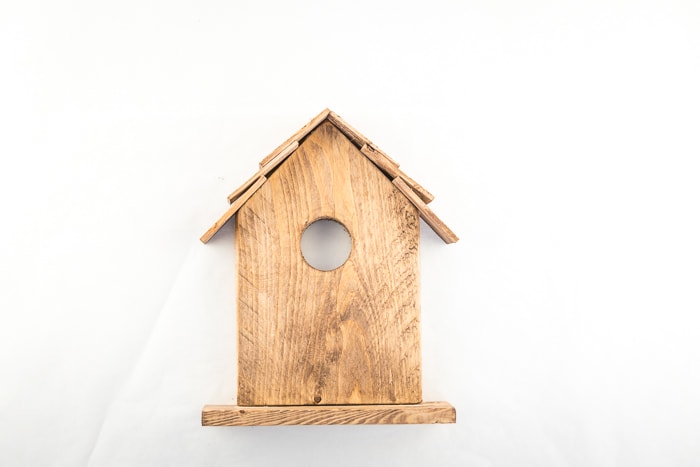
Step 1. Prep The Wood

Cut each board to the length needed for the birdhouse face height. Then cut a 45-degree angle on each side of the top to form the roof peak.
Next, you need to make the holes for each birdhouse.
For the small 5.75” birdhouse measure down 1.75” from the peak and drill a 1-inch hole. The measurement is to the top edge of the hole.
For the 8” birdhouse measure down 2.5” and drill a 1.25” hole. Use the same sized hole for the 10.5” birdhouse but with a 4.25” distance from the roof peak to the top of the hole.
Finally, sand all the edges smooth and wipe off any dust before going further.
Step 2. Add The Base

Center the birdhouse along the back edge of the base and nail them together. If you prefer you can also use wood screws.
Step 3. Add Shingles

Next, it’s time to start adding some cute shingles to the roof.
We use homemade wooden shingles but you can also buy mini shingles that are made for decorating dollhouses. It makes the project quicker!
Evenly space the shingles down each side so that they meet evenly at the top and have the overhang at the bottom that you like.
Attach each shingle with some hot glue and let them set until fully dried.
Step 4. Stain

You can stain the birdhouse ornaments any color you like but we love to use a dark walnut stain.
Using a foam brush paint the stain on the top, base and edges, then wipe off any extra stain with a rag. Set the birdhouses down on top of some parchment paper to dry.
Step 5. Decorate
Now it’s time to have fun decorating up your birdhouse ornament!
There are endless ways you can customize these but here is what I did.
Cut a length of nautical rope so that it just fits around the outside edge of the birdhouse hole.
Place a small dot of hot glue at the top edge and hold the rope down until the glue sets. Then slowly add a bit more glue as you work the rope around the opening.
Then take 2 small pieces of greenery and hot glue them down to cover the seam of the rope, finally, place a plastic berry on top.
We cut short branches and hot glued them to look like pegs on the front. Then glued down more branches along the front to look like a mini stack of firewood.
On the other side of the birdhouse, I glued down a small pinecone that had been painted with chalk paint to look like it had been dusted with snow.
Finally, I used some silver glitter glue to draw little icicles along the top edge of the birdhouse.

Repeat this decorating process with each birdhouse face you are making.

I just love how this set of birdhouse ornaments came out! Don’ you think they are cute too?
I love making rustic Christmas ornaments, they make your home feel so warm and fit in perfectly with our favorite country-style decor.
More Christmas Craft Ideas
Easy DIY Christmas Birdhouse Ornament
Equipment
- Foam paintbrushes
- 1 1/4” finishing nails
- Hot glue gun
- Drill
- Drill hole saws
- Chop saw or hand saw
- Hammer
Materials
- 1 x 4 cut to 5 3/4” – for the small birdhouse face
- 1 x 6 cut to 8” – for the medium birdhouse face
- 1 x 6 cut to 10 1/2” – for the large birdhouse face
- 1 x 2 cut to 5” – for the small birdhouse base
- 1 x 2 cut to 7” – for the medium birdhouse base
- 1 x 2 cut to 9” – for the large birdhouse base
- Mini wooden shingles
- Walnut stain
- Nautical rope
- Greenery
- Plastic red berries
- Silver glitter glue
- Hot glue
- Pinecones painted or natural
- Small sticks
Instructions
- Cut each board to the length needed for the birdhouse face height. Then cut a 45-degree angle on each side of the top to form the roof peak.
- Next, you need to make the holes for each birdhouse. For the small 5.75” birdhouse measure down 1.75” from the peak and drill a 1-inch hole. The measurement is to the top edge of the hole. For the 8” birdhouse measure down 2.5” and drill a 1.25” hole. Use the same sized hole for the 10.5” birdhouse but with a 4.25” distance from the roof peak to the top of the hole.
- Finally, sand all the edges smooth and wipe off any dust before going further.
- Center the birdhouse face along the back edge of the base and nail them together.
- Glue or nail the wooden shingles along each side of the roof evenly spacing them so that they are even at the top.
- Using a paintbrush apply the walnut stain to the entire birdhouse, then wipe off excess stain with a rag.
Once the birdhouse has fully dried you can start to decorate it. - Cut a length of nautical rope so that it fits around the outside of the birdhouse hole. Hot glue it down starting at the top edge and working slowly around the circle. Then glue 2 small pieces of greenery over top of the rope seam and then finally hot glue a red berry on top.
- Cut some short branches and hot glued one of them to look like a peg on the front. Then glued down more branches along the front to look like a mini stack of firewood.
- On the other side of the birdhouse glued down a small pinecone that had been painted with chalk paint to look like it had been dusted with snow.
- Finally, use some silver glitter glue to draw little icicles along the top edge of the birdhouse.
Video
Connect With Homestead Acres!
Be sure to follow me on social media, so you never miss a post!
Facebook | Twitter | Pinterest | Instagram
Visit my Amazon store to find all my favorite gardening, homesteading tools, and gadgets plus all of my printed garden books and journals!

Kim Mills is a homeschooling mom of 6 and lives on an urban homestead in Ontario, Canada. Blogging at Homestead Acres she enjoys sharing tips to help you save money, grow and preserve your own food.