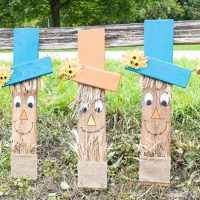
How To Make A Wooden Scarecrow Face
These wooden scarecrow faces are so cute and easy to make! You’ll love making lots of these adorable scarecrows to add to your front porch fall decor. Make them out of pallet boards or inexpensive 1x6 and 1x4.
Yield: 1
Cost: 3.00
Equipment
- 1 1/4" wood screws
- Screw gun
- Chop saw or hand saw
- Glue gun
- Foam paintbrushes
Materials
- 1 1x6 or wide pallet boards - cut to 31”
- 1 1x4 - cut to 12”
- Raffia
- Hot glue
- Walnut stain
- White chalk paint
- Black chalk paint
- Chalk paint color for the hat and nose
- Black paint pen
- Polyurethane
Instructions
- Cut a length of 1x6 to 31 inches long and a length of 1x4 to 12 inches long and sand smooth.
- Place the smaller hat brim piece on top of the 1x6 board where you would like the hat to sit. It can be straight across or on a slant. Draw a line across the face board to mark where the brim will be attached later.
- Using a walnut stain or your desired color stain the face side of the 1x6 board. Using a rag rub off the excess stain until you have the color you like. Set it aside to dry.
- Next, paint the hat side of the face board using your color choice of chalk paint. Also, paint the hat brim board to match.
- Draw or trace on the face of your scarecrow.
- Paint in the scarecrow face using chalk paint. You may need 2 to 3 coats of paint, make sure to let the paint fully dry between coats.
- When the face is complete trace around the outside of the eyes and nose with a black paint marker. Then draw on the mouth.
- Allow the paint to fully dry and then spray with a polyurethane sealer. Set aside too dry.
- Line up the hat brim along the face board and mark the edges. Then turn the brim over and glue raffia in-between the markings. If needed run a thin bead of hot glue overtop of the raffia to secure it.
- Line up the hat brim with the line on the face board and screw together.
- If desired decorate the hat by hot gluing on some fabric fall flowers and leaves.
- If you would like to add some more decoration to the scarecrow adding a burlap collar is really easy!
- Take some wide burlap ribbon and place it on the bottom of the scarecrow. Make a line just below the top as a guideline and glue lengths of raffia along this.
- After the raffia has dried glue on the burlap ribbon.