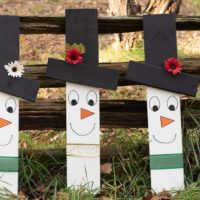
How To Make Wooden Snowman Faces
How to make super cute wooden snowman faces! You'll love making these simple but adorable snowmen out of pallets or cheap wood to decorate your front porch for Christmas. Why not make a whole family of snowmen to welcome visitors to your home this holiday.
Yield: 1
Cost: 3.00
Equipment
- Foam paintbrushes
- Small paintbrushes
- Cordless screwdriver
- Glue gun
- Polyurethane
- Wood screws 1 1/4"
Materials
- 1 1 x 6 - 31” long or pallets
- 1 1 x 4 - 12” long
- White chalk paint
- Black chalk paint
- Orange chalk paint
- Black paint marker
- Fake Flowers
- Ribbon
- Glue sticks
Instructions
- Cut your wood to length and sand well. Make sure to wipe off any dust before starting.
- Place the 1 x 4 hat brim pice on top of the 1 x 6 facepiece and line it up to where you would like that hat brim to sit. Draw a line along the bottom edge to mark your painting line.
- Paint the top hat black as well as the matching brim piece, set aside to dry.
- Paint the bottom of the snowman face white with chalk paint, it may need 2 or 3 coats of paint depending on your wood. Make sure to let it thoroughly dry between coats.
- Trace the snowman face template onto the wood, then paint the eyes and nose. Once they have fully dried outline them using a black paint pen and then draw on the mouth.
- Screw the hat brim onto the main face board using the guideline you drew before.
- If you are going to have the snowmen outside use a spray polyurethane sealer to protect it from the weather.
- Decorate your snowman face any way you like, adding flowers to the top hat and ribbon or a scarf around the base looks really cute!