
How To Make Wooden Snowman Faces (With Printable Template)
This post may contain affiliate links, my full disclosure can be read here. As an Amazon Associate I earn from qualifying purchases.


How to make a wooden snowman face to decorate your front porch or yard for Christmas. If you are looking for an easy Christmas craft then you will love this adorable pallet snowman easily made with old pallet boards or inexpensive wood.
Christmas has always been my favorite holiday of the year. I have to admit I’m a little Christmas crazy and love to decorate the house a lot during the holidays.
But if I could only pick one holiday theme to decorate with then it would have to be snowmen!
Maybe it’s because I loved the old Frosty cartoons as a kid so much but it wasn’t winter to me until you had enough snow to build a big snowman.

The good news is these cute snowman decorations are so easy to make even if you aren’t very crafty. Remember with rustic crafts things don’t have to look “perfect” and actually look better when they are a little ruffed up, it gives them a nice aged look.
How To Make A Wooden Snowman Face
Supplies
- 1 x 6 – 31” long (or pallets)
- 1 x 4 – 12” long
- Wood screws 1 1/4”
- White chalk paint
- Black chalk paint
- Orange chalk paint
- Black paint marker
- Fake Flowers
- Ribbon
- Foam paintbrushes
- Small paintbrushes
- Glue gun
- Glue Sticks
- Cordless Drill/Driver
- Polyurethane
Step 1. Prepare The Wood
If you are using pallets then you will need to remove the boards and trim off the nail holes or fill them in with wood filler.
We can’t always find wide board pallets easily here so prefer to use cheap wood like 1 x 6 and 1 x 4 to make our projects.
Cut the 1 x 6 to 31 inches long and the 1 x 4 to 12 inches long and sand until smooth. Wipe any dust off of the wood before going further.
Step 2. Mark The Hat Placement

Place the hat brim piece on to the 1 x 6 face board and draw a line to mark where the brim will go. You can have the hat go straight across or have it on an angle. I think making the hat look like it’s tipping looks so cute!
Step 3. Paint The Hat

Using your foam paint brush paint the hat side of the 1 x 6 face board black making sure to get the sides and top edge. Then set it aside to dry.

Next, paint the hat brim piece back as well and set it aside to dry.
Step 4. Paint The Snowman White

When the black paint has finished drying paint the snowman face side of the board white. This will take 2 to 3 coats depending on the wood and brand of paint you are using.
I find that 2 coats of white paint are normally enough.
Let the paint fully dry before moving on.
Step 5. Draw On The Face

Now it’s time to start the fun part! Draw a face on your wooden snowman. You can freehand it if you like, I’m not very good at drawing faces so I made a template that I could print out and use.
You can download the template below to make it easier if you like! Use transfer paper to copy the design onto the snowman’s face or print it out on card stock and then cut the insides of the eyes and nose shape out to make a stencil.
For making a mouth I often use a soup or tomato sauce can and trace the curved edge to make a nice big smile.
Step 6. Paint The Snowman Face
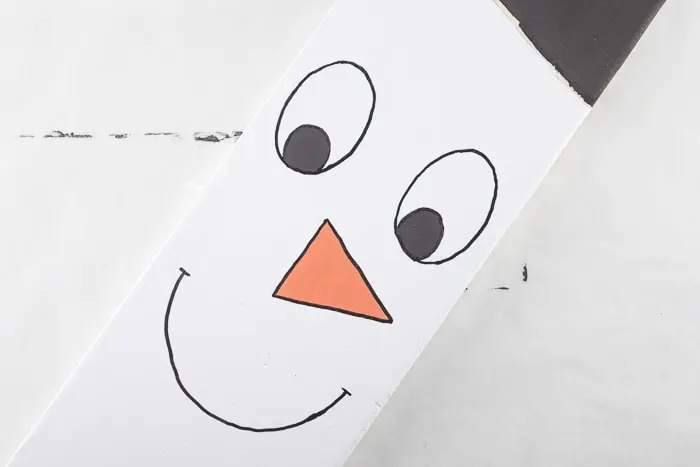
Using the black chalk paint, paint in the snowman’s eyes. Then use orange to paint the nose to look like a carrot.
Let the paint fully dry and then trace around the edges of the eyes and nose with a black paint marker. This really helps them to stand out from the white face.
Finally, trace over the mouth shape as well.
Step 7. Attach The Hat
Line up the hat brim piece and turn the snowman over, secure the brim using 3 wood screws.
Step 8. Seal The Wood
This step is optional if you are using the snowman as an indoor decoration, but if you plan to have the snowman faces outside on your porch or where they can get wet at all then it’s a good idea to seal the wood with a spray-on polyurethane.
Step 9. Decorate The Hat And Face

Now your snowman can be finished if you want, but it’s even cutter if you add some decorations.
I like to glue a small cloth flower onto the hat, sometimes with some green leaves poking out from behind it.
You should be able to find lots of small pretty flowers at your local dollar store, one flower pick can be used to make a lot of snowman hats!

Next, take some ribbon and wrap it around the base securely gluing it down in the back. If you don’t have ribbon using a fleece scarf looks really cute too.

See it’s really easy to make a wooden snowman face out of old pallets or cheap lumber! Try making a few of these cuties to brighten up your front porch this winter.
You could even make a double-sided one making this snowman on one side and this cute scarecrow face on the other.
** Download Snowman Face Template HERE **

How To Make Wooden Snowman Faces
Equipment
- Foam paintbrushes
- Small paintbrushes
- Cordless screwdriver
- Glue gun
- Polyurethane
- Wood screws 1 1/4″
Materials
- 1 1 x 6 – 31” long or pallets
- 1 1 x 4 – 12” long
- White chalk paint
- Black chalk paint
- Orange chalk paint
- Black paint marker
- Fake Flowers
- Ribbon
- Glue sticks
Instructions
- Cut your wood to length and sand well. Make sure to wipe off any dust before starting.
- Place the 1 x 4 hat brim pice on top of the 1 x 6 facepiece and line it up to where you would like that hat brim to sit. Draw a line along the bottom edge to mark your painting line.
- Paint the top hat black as well as the matching brim piece, set aside to dry.
- Paint the bottom of the snowman face white with chalk paint, it may need 2 or 3 coats of paint depending on your wood. Make sure to let it thoroughly dry between coats.
- Trace the snowman face template onto the wood, then paint the eyes and nose. Once they have fully dried outline them using a black paint pen and then draw on the mouth.
- Screw the hat brim onto the main face board using the guideline you drew before.
- If you are going to have the snowmen outside use a spray polyurethane sealer to protect it from the weather.
- Decorate your snowman face any way you like, adding flowers to the top hat and ribbon or a scarf around the base looks really cute!
More Christmas Fun
- DIY Rustic Christmas Ornaments
- Easy No-Bake Christmas Cookies
- Tips For Making Your Christmas Tree Last Longer
- Make Your Own Christmas Tree Preservative
Connect With Homestead Acres!
Be sure to follow me on social media, so you never miss a post!
Facebook | Twitter | Pinterest | Instagram
Visit my Amazon store to find all my favorite gardening, homesteading tools, and gadgets plus all of my printed garden books and journals!

Kim Mills is a homeschooling mom of 6 and lives on an urban homestead in Ontario, Canada. Blogging at Homestead Acres she enjoys sharing tips to help you save money, grow and preserve your own food.


Can’t seem to find the printable snowman template to download.