
DIY Snowy Mason Jar Luminaries (Quick & Easy)
This post may contain affiliate links, my full disclosure can be read here. As an Amazon Associate I earn from qualifying purchases.


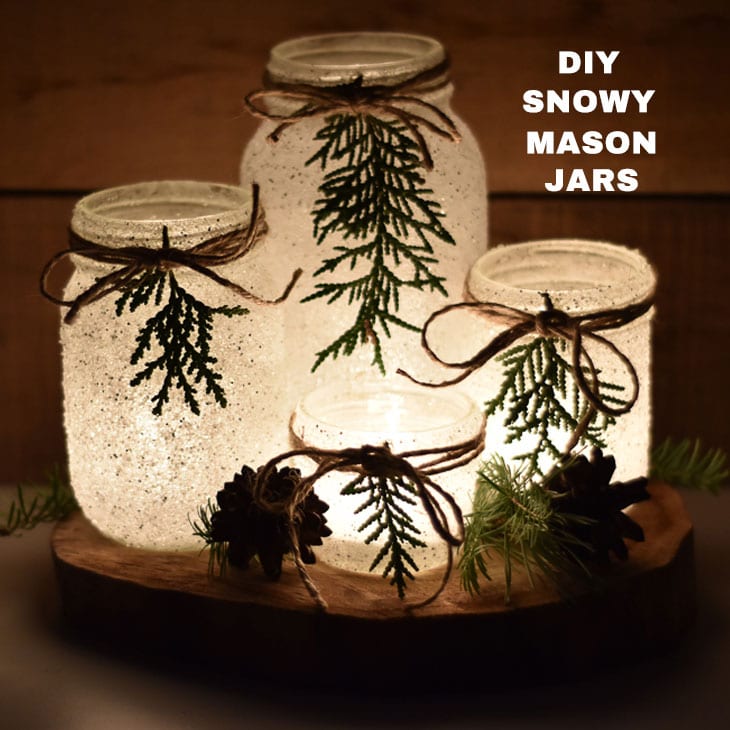
DIY Snowy Mason Jar Luminaries – Have fun making these easy snowy mason jar candle holders. They are perfect for your Christmas holiday decor!

Are you looking for a quick and easy Christmas craft?
Then you’re going to love these easy snowy mason jar luminaries!
These pretty candle holders look so beautiful when you use them as a table centerpiece or to decorate your mantel.
I love to sit and watch how the light flickers off the jars because coating them in a mixture of Epsom salts and silver glitter makes them look just like real snow.
They are beautiful during the day when not lit and just as lovely at night as they glow.
I’ve used real tea lights in these jars, and it works great. But my favorite thing to use are these battery powered flickering tea lights.
With kids and cats in my home, I love that I don’t have to worry about candle safety in my holiday decorations but I still get that beautiful flicker glow that real candles give off.
Supplies
- Mason Jars
- Greenery
- Epsom Salts
- Silver Glitter
- Twine
- Tacky Glue
- Paint Brush
- Hot Glue
- Tea Lights
- Polyurethane Sealer Spray
How To Make Snow Mason Jar Luminaries
Step 1. Mix The Faux Snow
In a plastic container or shallow bowl, combine 1 cup of Epsom salts and 1 to 1 1/2 tablespoons of silver glitter. Stir until it’s well combined.
This is enough of the mixture to coat a few jars, simply mix up more as needed.
Step 2. Brush On The Glue

Apply a thin layer of tacky glue over the mason jar. I find a foam brush like this works the best.
Make sure not to put the glue on too thick, or it will start to run and drip, a thin layer is perfect. If your mason jar has a raised pattern or writing on it, use a dabbing motion over that area to get the glue in between the pattern pieces.
Step 3. Roll In The Snow

Once the mason jar has been coated in glue, roll it in the mixture of Epsom salts and glitter.

To help coat the areas around the jar neck, you can use a spoon to pour extra Epsom salts on. Don’t worry the excess will fall off easily.
Once the mason jar has been coated well place it onto some parchment paper to dry. It’s best to let the jars sit overnight to fully dry before the next step, but if you are in a hurry and use a quick-drying tacky glue you can get away with just a few hours of drying time.
Step 4. Seal The Jars

When the snowy mason jars have dried, spray them with a polyurethane sealer. This helps to keep the Epsom salts from falling off the jars.
Make sure to use one that is non-yellowing like this one so that your jars stay a pretty white over time.
Then set them back on the parchment paper until they are fully dry.
Step 5. Add Greenery And A Bow
Now it’s time to have fun decorating your snowy mason jar luminaries! I picked some cedar clippings from our backyard, but you can use any kind of greenery you have. Even fake greens will work.


Cut the greens into small sections and attach them to the top of the jar with a small dot of hot glue.

Wrap a length of twine around the rim of the mason jar a few times and tie it into a bow.

Now your pretty snowy mason jar luminaries are done! Just add a tea light and enjoy the warmth these mason jars bring to your holiday decor.
Substitutions
- Mod Podge: Use Mod Podge in place of tacky glue to hold the Epsom salts on.
- Coarse salt: Coarse sea salt or kosher salt works if you don’t have Epsom salts, but Epsom salts give the most sparkly, snow-like look.
- Faux greenery: Fake greens work just as well as fresh clippings and will last for years.
- Ribbon: Use a thin red or plaid ribbon in place of the twine for a more festive look.
Variations
- Plain winter jars: Skip the greenery and bow for simple snowy jars you can leave out all winter.
- Mix up the sizes: Use a mix of pint jars, jelly jars, and quart jars for a pretty grouping on the table.
- Gold glitter: Swap the silver glitter for gold to give your jars a warm, glowing look.
- Covered porch: Set them on a covered porch or front step with battery tea lights to welcome guests.

FAQ’s
More Christmas Fun
- Mini Yarn Hat Ornaments
- DIY Christmas Tree Preservative
- Tips For Making Your Real Christmas Tree Last Longer
- Easy Christmas Painted Mason Jars
- Painted Mason Jars With Burlap Ribbon
- DIY Twig Christmas Trees

Connect With Homestead Acres!
Be sure to follow me on social media, so you never miss a post!
Facebook | Twitter | Pinterest | Instagram
Visit my Amazon store to find all my favorite gardening, homesteading tools, and gadgets plus all of my printed garden books and journals!

Kim Mills is a homeschooling mom of 6 and lives on an urban homestead in Ontario, Canada. Blogging at Homestead Acres she enjoys sharing tips to help you save money, grow and preserve your own food.


Hi Kim! I was wondering, if these have been sprayed with a sealer when complete, will they last for years without losing much of the epsom salts??
I had tried to do the Epson salt thing to jars …couple years ago…and they salts just keep coming off so very messy…What did you say to spray on it after dry..
Mine yellowed! I used mog pog, epsom salt,and glitter. then sprayed with clear acrylic.
It could be the acrylic spray some of them will turn yellow over time. I’ve been using these jars for years with not problems or yellowing. Make sure your sealer says that it’s non yellowing.
Can you put a real votive candle inside?
Thank you!
this does indeed look very quick and easy to do…. and they look quite nice! Have you tried colours other than silver?
I’ve made a few with gold and red and they are pretty too! But if you want it to look more like snow then the silver is the best glitter color to use. 🙂