This post may contain affiliate links, my full disclosure can be read here. As an Amazon Associate I earn from qualifying purchases.


You’ll love these easy DIY twig Christmas trees! These simple, rustic branch trees are a perfect budget-friendly craft idea and look so pretty as part of your mantel or table centerpiece display. Once you see how to make Christmas trees out of twigs you’ll always be looking for branches in your yard to make fun holiday projects with.
I’ve been having so much fun making lots of new Christmas decorations using natural materials from our homestead and simple craft supplies that I already have on hand.
If you are looking for a way to stretch your Christmas decor budget then decorating with homemade ornaments is a perfect way to do that!
These rustic twig Christmas trees look so cute on our mantel and cost me nothing to make other than a little bit of glue.


But even if you needed to buy some small items to decorate these trees with it would only cost you a few dollars at a dollar store.
DIY Twig Christmas Trees
Supplies
- Sticks
- Hot glue
- Glue gun
- Scissors
- Pruning shears
- Embellishments ( I used star brads like these)
Step 1. Gather Your Sticks
Before you get started you’ll need to gather up some sticks and twigs.
Take a look around your yard for branches that have fallen that you can easily use. If you can’t find any then you can simply prune a little off your one of your trees or shrubs.
You’ll want a branch that is about 1 1/2 to 2 inches wide for the base and then some narrow twigs for the stem and tree branches.
Step 2. Make A Template
While you can just start cutting the branches up and making a tree shape I find it so much easier if you make a simple triangle pattern to work off of first.
Cut the stick that you want to use as the tree trunk first.
I wanted to make 3 twig trees with 1 of them being taller than the others. So I cut 2 sticks at 6 inches in length and another one at 9 inches in length.
For the 6 inch tall one I placed it onto a piece of paper and along the bottom drew a line that was 4 1/2 inches long, making sure the tree trunk was centered.
Then from the top point draw a line down each side to form a triangle. This I now makes the perfect guideline to cut the twigs to so each one is just a little smaller than the previous twig.
Step 3. Cut The Branches
If you have trouble with the stick you are using for the trunk rolling around then just secure the end with a small piece of painters tape.


Next, cut a twig so that it fits just between the bottom lines. Place a small dab of hot glue onto the trunk and hold the twig in place until it has dried.


Repeat this step cutting each twig to size as you move up the tree.
Step 4. Add The Base


Take a small section of your tree branch about 1 1/2 to 2 inches wide and drill a shallow hole in the center just large enough for the tree trunk branch to fit inside.
Add a little hot glue to the hole and place the tree inside, holding it until the glue has set.
Step 5. Decorate


Now it’s time to decorate your twig Christmas tree! Yes, they are super cute just left as is too but I like to dress them up a little.
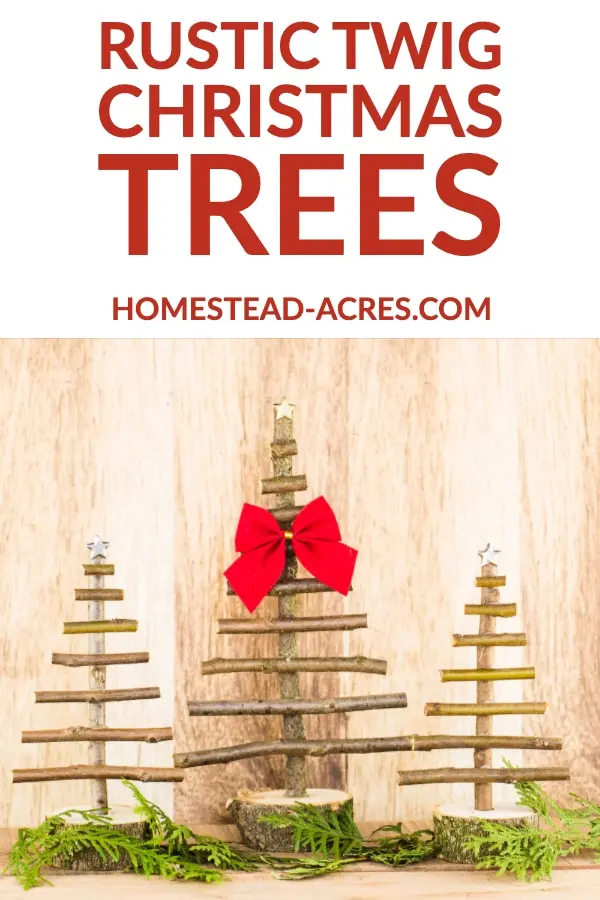
I wanted to place a star on the top of each tree but I didn’t have any small wooden stars on hand. I really wanted to keep this craft idea as budget-friendly as possible and use what I already hand on hand.
So I went looking through my supplies and found these cute star-shaped paper brads in gold and silver.
I added a dab of hot glue to the tops of the trees and placed the brad pegs onto the glue so that the star looked like it sat on the front of the tree.


I think they look so cute!
You can add any tiny ornaments or bows that you like to dress up your rustic trees. For the larger one, I added a small red bow to the center and love how the little pop of color makes it stand out.
Have fun making these easy twig Christmas trees and tucking them around your home. I think they look super cute on our mantle but they also make great decorations for a side table or centerpiece.
More Easy Christmas Crafts

DIY Twig Christmas Trees
Equipment
- Hot glue gun
- Pruning shears
- Scissors
Materials
- Sticks
- Hot glue
- Embellishments
Instructions
- Gather the sticks and twigs that you will use to make your trees.
- Optionally before you start gluing branches onto your tree make a template to help keep the edges even. For the smaller tree cut a branch 6 inches long and place it onto a piece of paper. Draw a line 4.5 inches long across the bottom making sure the branch for the tree trunk is centered. Place a mark at the top, then using a ruler join the ends to form a triangle.
- With the trunk centered, hold a smaller twig across the template to see where you need to make the cut.
Glue the twig branch across the trunk using a dot of hot glue. Continue cutting branches to fit as you work up the tree trunk. - To make the base take a 1.5 to 2 inch wide section of a tree branch and cut it to be about 1 inch tall.
- Then drill a shallow whole in the center just big enough to fit the trunk into.
- Add a little hot glue into the hole and place the tree inside, holding it until the glue has set.
- If desired add some decorations to your tree. I love to use small star shaped brads on the top and little red bows in the middle.
Video
Notes
Connect With Homestead Acres!
Be sure to follow me on social media, so you never miss a post!
Facebook | Twitter | Pinterest | Twitter
Visit my Amazon store to find all my favorite gardening, homesteading tools, and gadgets plus all of my printed garden books and journals!


Kim Mills is a homeschooling mom of 6 and lives on an urban homestead in Ontario, Canada. Blogging at Homestead Acres she enjoys sharing tips to help you save money, grow and preserve your own food.