Easy No Sew Velvet Pumpkins
This post may contain affiliate links, my full disclosure can be read here. As an Amazon Associate I earn from qualifying purchases.


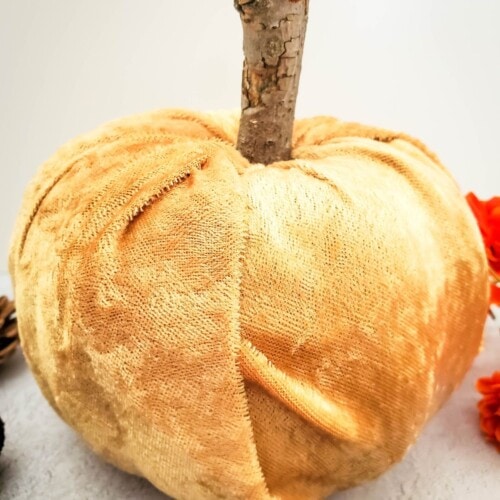
If you’re looking for a quick fall craft that adds a cozy touch to your home, these no-sew velvet pumpkins are the perfect project. With just a few pumpkins, some soft velvet fabric, and a glue gun, you can create beautiful DIY decor in minutes, no sewing or fancy skills required.
These cute cloth pumpkins are so much fun to make. They look like something you’d find in a boutique, but they are so simple and budget-friendly to make at home.
Whether you’re decorating a mantle, creating a centerpiece, or crafting with friends, this is a fun and easy way to welcome fall.

Why You’ll Love This Easy Pumpkin Craft
No Sewing Needed – You don’t need any special tools or skills to make these cute pumpkins. Just some basic supplies and some hot glue. It’s quick, simple, and stress-free.
Gorgeous Fall Decor on a Budget – These velvet pumpkins look high-end but are made with inexpensive materials, making them a great DIY alternative to store-bought decor.
Customizable – Swap the fabric color or use different stem materials to match your fall theme. Whether you like rustic or modern, you can easily make it suit your style.
Quick And Fun – Each pumpkin takes just a few minutes to make, so you can easily create a whole centerpiece in an afternoon.
Material Notes

Velvet Cloth – You can use any type of velvet you have on hand, but a stretchy cloth will work the best.
Foam Pumpkin – Make sure to use a foam pumpkin, not plastic ones, as they are much harder to cut.
Stick – You have so many fun options when selecting the stick that will be the new stem of your pumpkin. You can find a stick outside and trim it to fit, or you can use a cinnamon stick, a wine cork, or a real dried pumpkin stem.
How To Make No-Sew Velvet Pumpkins
Step 1

Cut your fabric to make a 14×14-inch square and set it aside.
Step 2

Remove the stem from the pumpkin and cut around the stem at the top of the pumpkin using a good pair of scissors.
You want just enough room to tuck the corners of the fabric inside, then to push your stick through.
Step 3

Place your pumpkin in the center of the fabric square. Take one corner and pull it up, then to the top middle of the pumpkin where you cut out the stem. Tuck it into the hole you made.

Now, take the corner next to that and bring it up to the center and tuck it in. Repeat with the two remaining corners.

Stick your finger in the hole in the pumpkin and make sure all the ends are tucked in tightly.
Step 4

Apply a generous amount of hot glue to the stem hole.
Step 5

Then push the stick through the hole into the glue. Hold it in place for about 30 seconds until it’s dried and secure.

Tips For Choosing Velvet Fabric
Use What You Have – Check your stash before buying anything new, if you have scrap fabric on hand already, this is the perfect project for that. Even small pieces of velvet can be turned into mini pumpkins.
Thrift Store Finds – Old velvet clothing, like dresses or tops from thrift stores, that can be cut up and repurposed. It’s great for crafting on a budget.
Stretch Velvet Works Best – If possible, try to use stretch velvet or crushed velvet. The fabric is more forgiving and molds nicely around the pumpkin without bunching too much.
Pick Fall Colors – Rust, mustard, deep green, burgundy, or classic ivory all look gorgeous in autumn decor displays. You can also go for soft pastels or jewel tones if you prefer a modern twist.
More Fall Craft Ideas
Easy No Sew Velvet Pumpkins
Materials
- 5.5 inch Foam pumpkin
- 14 x14 inch piece of velvet fabric
- Scissors
- Hot glue gun and glue stick
- Stick 6-8 inches long, about 1 inch in diameter
Instructions
- Cut the fabric to make a 14×14-inch square and set it aside.
- Remove the stem from the pumpkin and cut around the stem at the top of the pumpkin using a good pair of scissors. It needs to be just large enough to push the fabric and stick into.
- Set the pumpkin in the center of the fabric square. Take one corner and pull it up, and tuck it into the hole.
- Now, take the corner next to that and bring it up to the center and tuck it in. Repeat with the two remaining corners.
- Insert your finger into the hole in the pumpkin and ensure all the ends are secure.
- Apply a generous amount of hot glue to the stem hole.
- Then push the stick through the hole into the glue. Hold it in place for about 30 seconds until it’s dry and secure.
Connect With Homestead Acres!
Be sure to follow me on social media, so you never miss a post!
Facebook | Twitter | Pinterest | Instagram
Visit my Amazon store to find all my favorite gardening, homesteading tools, and gadgets plus all of my printed garden books and journals!

Kim Mills is a homeschooling mom of 6 and lives on an urban homestead in Ontario, Canada. Blogging at Homestead Acres she enjoys sharing tips to help you save money, grow and preserve your own food.