
How To Paint Plastic Pumpkins For A Cute Farmhouse Look
This post may contain affiliate links, my full disclosure can be read here. As an Amazon Associate I earn from qualifying purchases.


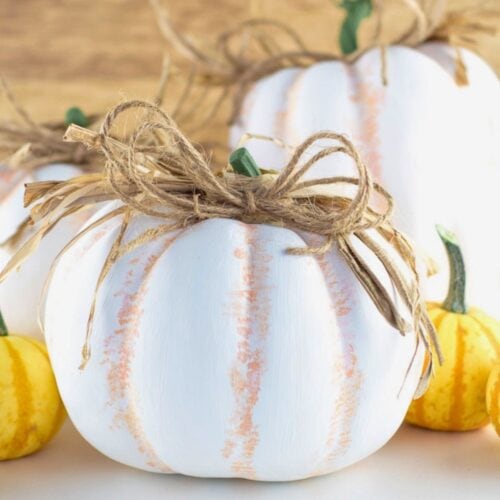
Wondering how to paint plastic pumpkins? It’s really easy! Make your own painted farmhouse pumpkins using dollar store plastic pumpkins for a super cute fall decoration.
These quick and easy pumpkin crafts are perfect for table centerpieces, mantle displays, or decorating your front porch for Thanksgiving.
I love the look of decorative pumpkins as part of my fall and Thanksgiving decor, but they can be so expensive to buy.
Instead, I paint my own pumpkins to help stretch my budget and have a lot of fun too.
I found these cute but cheap plastic pumpkins at our local dollar store for only $3 each. I’ve heard they are much cheaper at Dollar Tree and other American dollar stores.

Either way even with the paint included each pumpkin decoration cost me less than $4 to make.
That’s perfect when you are looking for Thanksgiving decorating ideas on a budget.
Besides saving money when you paint your own pumpkins you can make them match whatever your home decor style is and change your color theme from year to year without breaking the bank.
I love a neutral farmhouse color scheme, but with pops of color that can be hard to find. But whatever color palette you like to decorate your home with, you can make these fall pumpkins to match.
Tips For Painting Plastic Pumpkins
What Is The Best Paint To Use On Plastic Pumpkins?
Chalk paint is the best paint for plastic pumpkins because it sticks to the shiny plastic without a primer.
Painting on plastic can be tricky, and if you’ve been wondering if you can paint on plastic pumpkins, the answer is yes.
There are many ways you can paint plastic pumpkins, but my favorite is to use chalk paint. It doesn’t require you to prime the pumpkins first and doesn’t have any problem sticking to the shiny plastic coating.
If you don’t have chalk paint, use this two-step method instead. First, spray the pumpkins with a primer made for plastic. Once it’s dry, you can then use normal spray paint or acrylic paint to decorate your pumpkins.
How To Make Fake Pumpkins Look Real
You can paint pumpkins to be any color you like and not be limited to just orange. Real pumpkins come in so many colors, from orange to white, solid, striped, or speckled.
But to make your fake pumpkins look real you will want to add shading to them. This can be done in just the grooves or you can add multiple layers of shading over the entire pumpkin.
Tips For The Best Results
- Paint the top first. Start at the stem and work down to where the pumpkin curves under. Paint the bottom last, so you always have a dry spot to set it on.
- Use thin coats. It takes 3 to 4 coats of white to cover bright orange plastic. Let each coat dry before adding the next.
- Keep your brush dry for shading. Wipe most of the paint off before you dab it in the grooves. A little goes a long way.
- Tape the stem. Painter’s tape keeps the stem clean while you paint the pumpkin.
- Keep them indoors. These painted pumpkins are made for indoor decor, like your table, mantel, or shelves.
How To Make Farmhouse Painted Pumpkins
The Quick Steps
- Clean the pumpkins and tape the stems.
- Paint the tops with 3 to 4 coats of white chalk paint, then paint the bottoms.
- Paint the stems green, brown, or tan.
- Dry brush a soft orange or light brown into the grooves.
- Dry brush a little white over the shading to soften it.
- Glue raffia around the stem and add a twine bow.
Supplies
- Plastic pumpkins
- White chalk paint
- Orange chalk paint
- Green chalk paint
- Foam paint brushes
- Small bristle paint brush
- Glue Gun
- Hot Glue Sticks
- Raffia
- Painters tape
- Twine
I used FolkArt chalk paint in Adirondack (white), Monarch (orange), and Irish (green). But you can use whatever your favorite color combination is!
Step 1. Clean The Pumpkins

Before starting to remove any tags or stickers from the plastic pumpkins and wipe them down to make sure they are clean.
Then wrap the stem in painter’s tape to keep it clean.
Step 2. How To Paint Pumpkins White

Using a foam paint brush start painting the first coat of white chalk paint onto the pumpkin.
I found the easiest way to do this is to start at the top and work from the stem edge down to where the pumpkin starts to curve under to the base.
Waiting to paint the bottom until later makes it easy to set the pumpkin down when the paint is drying.
You will need to put on multiple coats of paint to cover the bright orange color. I used 3 to 4 coats of white paint.
Once that step is done, paint the bottom of the pumpkin and lay it on its side to dry.
Step 3. Paint The Stems

Once the pumpkin has dried, remove the painter’s tape from the stem and paint it to remove the plastic look.
I used green but you could also use brown or tan depending on the look you are going for.
Step 4. Add Shading To Make Faux Pumpkins Look Real

Next, you’ll take a second paint color and dab it into the grooves of the pumpkin using a dry brush.
This means that you put a little paint onto the brush and then wipe most of it off on your palette before applying it to the pumpkin.
I mixed orange and white together to make a soft orange color, but you could also use a light brown.

Let the orange paint fully dry, then dab over it with some white paint. This will soften the look a lot.
Adding a second color to the pumpkin grooves is totally optional, but I think it makes them look more real and adds a nice depth.
Step 5. Add Some Cute Decorations

Take a length of raffia and glue it down on one edge of the pumpkin stem, then wrap it around and glue it down so that it crosses with the ends sticking out.
Once it’s dried repeat this on the other side of the stem as well.

Then make a small twine bow and glue it on at the base of the stem.

See it was really easy to make these cute farmhouse style painted pumpkins right? Have fun making lots of cheap pumpkins to decorate your home this fall and save a bundle too.
Variations
- Shading colors: Use a light brown instead of orange in the grooves for a more neutral look.
- Base colors: Real pumpkins come in so many colors. Try orange, white, striped, or speckled.
- Stem colors: Paint the stems green, brown, or tan.
- Ribbon: Swap the twine bow for a burlap ribbon.
Making Painted Pumpkins With Older Kids
I’ve done this craft with my older kids, and it’s a fun fall project to do together. Let everyone pick their own colors and design. An adult should handle the hot glue for the raffia and bow, or keep a close eye on older kids using it.
Looking for crafts for younger kids? Try these fun fall crafts for kids.
FAQ’s
More Fall Crafts And Decor Ideas
- How To Make A Wooden Scarecrow Face
- Fun DIY Fall Decor Ideas
- 30 DIY Fall Wreath Ideas You Will Love
- Easy No Sew Velvet Pumpkins
- 11 Easy Fall Crafts To Make And Sell
How To Paint Plastic Pumpkins For A Cute Farmhouse Look
Equipment
- Foam paint brushes
- Small bristle paint brush
- Glue gun
- Hot Glue Sticks
Instructions
- Remove any tags or stickers from the plastic pumpkins and wipe them down to make sure they are clean.
- Wrap the stem in painter's tape to keep it clean.
- Using a foam paint brush apply the first coat of white paint starting from the base of the pumpkin stem and working down to where the bottom starts to curve under. When the first coat is finished set the pumpkin aside to dry. Apply as many coats as needed until you can’t see the orange plastic coming through, 3 to 4 coats are normally enough.
- Once the top has been painted and dried finish painting the bottom of the pumpkin and then set it on its side to dry.
- Remove the painter's tape from the stem and paint with your choice of green or brown paint, and let it dry.
- Next, use your choice of secondary colors to add shading to the pumpkins. I mixed orange and white chalk paint together to make a very light orange and applied it in the grooves of the pumpkin using a dry brush. Set it aside to dry.
- If desired dry brush some white paint over top of the orange to soften the look and let dry.
- Take a length of raffia and glue it down on one side of the pumpkin stem, wrap the ends around and glue on the other side. Then repeat this step starting the next section of raffia on the opposite side of the stem.
- Make a small bow out of twine and hot glue it to the base of the pumpkin stem.
Video
Connect With Homestead Acres!
Be sure to follow me on social media, so you never miss a post!
Facebook | Twitter | Pinterest | Instagram
Visit my Amazon store to find all my favorite gardening, homesteading tools, and gadgets plus all of my printed garden books and journals!

Kim Mills is a homeschooling mom of 6 and lives on an urban homestead in Ontario, Canada. Blogging at Homestead Acres she enjoys sharing tips to help you save money, grow and preserve your own food.


